How to Record Screen with Audio on Mac: The Ultimate Guide (2026)
March 23, 2026—5 min read
How to Record Screen with Audio on Mac: The Ultimate Guide (2026)
Recording your screen on a Mac is a fundamental skill for remote workers, educators, and content creators. Whether you're creating a software tutorial, recording a meeting, or capturing a gameplay highlight, you often need to capture more than just the visuals—you need audio.
However, many Mac users find themselves frustrated when they realize that macOS, by default, makes it surprisingly difficult to record "System Audio" (the sound coming from your apps and OS) due to privacy and security architecture.
In this guide, we’ll walk you through the two primary methods to record your screen with audio on Mac, ranging from built-in tools to professional solutions like Recorder.
The Challenge: Why is System Audio so Hard to Record?
Apple's macOS is designed with a strict security model. By default, apps are not allowed to "listen" to the output of other apps. This prevents malicious software from recording your private calls or music without permission. While great for security, it creates a hurdle for screen recording:
- Microphone Audio: Easy to record (Built-in).
- System Audio: Hard to record (Requires specialized drivers or software).
Let's look at the solutions.
Method 1: Using the Native Screenshot Toolbar (Quick & Simple)
Since macOS Mojave, Apple has included a built-in screen recording utility that is easy to access. This is the best way to record your screen if you only need microphone audio and basic functionality.
How to use it:
- Press
Command + Shift + 5on your keyboard. - A toolbar will appear at the bottom of the screen.
- Choose to record the Entire Screen or a Selected Portion.
- Click Options.
- Under Microphone, select your preferred input (e.g., MacBook Pro Microphone).
- Click Record.
The Limitation: This method cannot record system audio (the sound from a YouTube video or a Zoom call) natively. It only records what your microphone picks up.
Method 2: The Professional Way with Recorder (Recommended)
If you need to record high-quality video along with crystal-clear system audio and microphone input simultaneously, the built-in tools often fall short. This is where Recorder comes in.
Recorder is designed specifically to bypass the technical hurdles of macOS audio routing, making it a "one-click" solution for professional-grade captures.
Step 1: Download and Install
First, head over to the Recorder Download Page to get the latest version for Mac. Follow the installation prompts and ensure you grant the necessary permissions for Screen Recording and Accessibility in your System Settings.
Step 2: Enabling System Audio
This is the part where most other apps struggle, but Recorder makes it simple.
- Open the Recorder app.
- Look for the audio settings in the recording dashboard.
- Simply tap on the "System Audio" button/toggle to enable it.
- Recorder will automatically handle the audio routing, allowing you to capture the sound coming from your browser, music players, or video conferencing apps without needing complex third-party drivers like BlackHole or Soundflower.
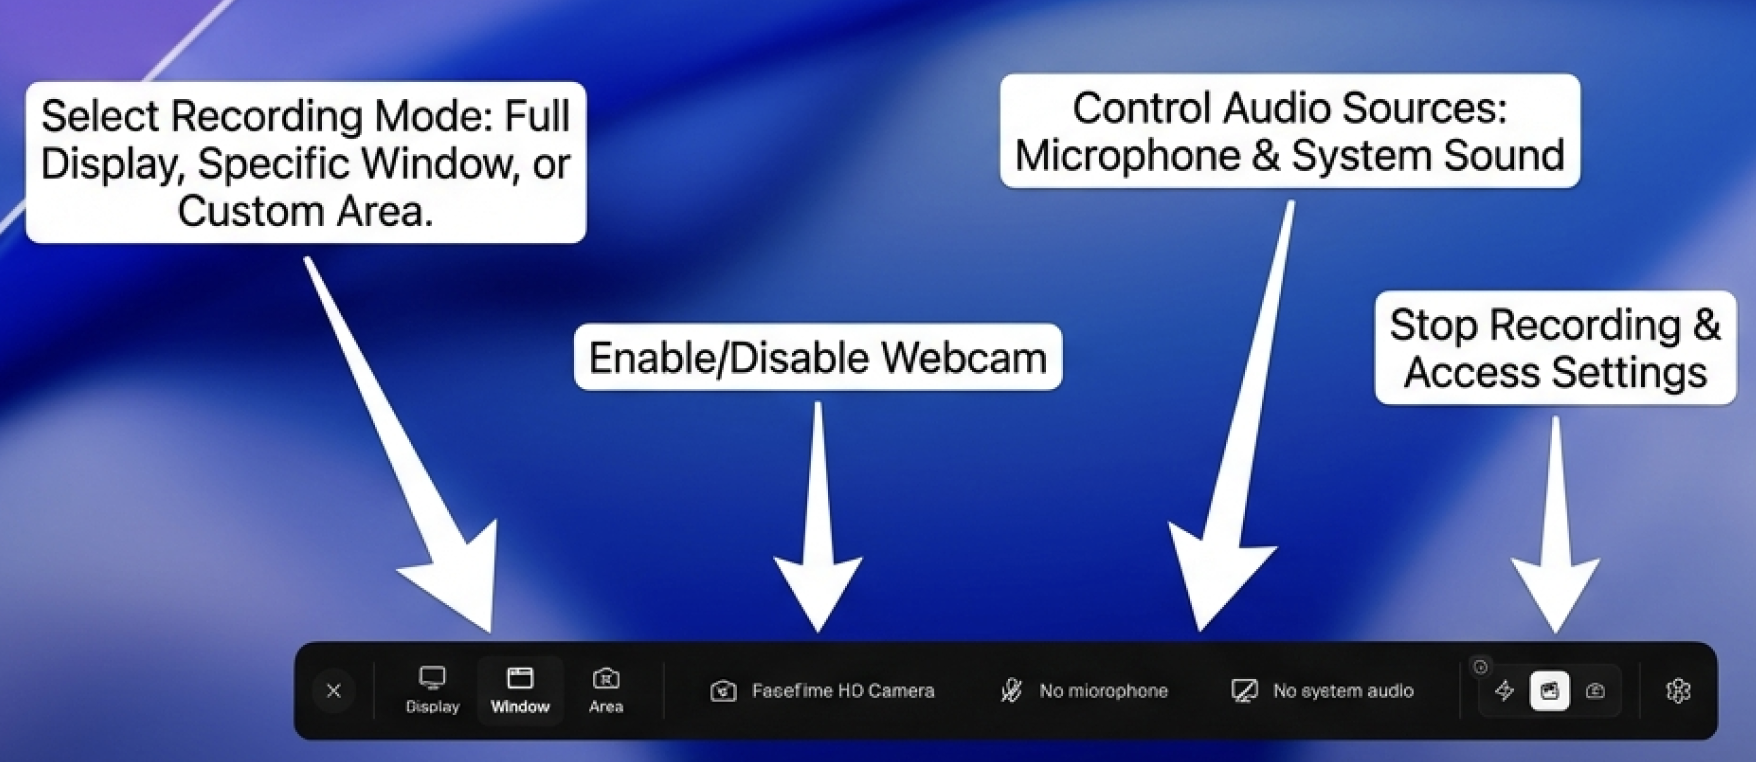
Step 3: Start Recording
Select your recording mode (Full Screen or Area), ensure your microphone is also selected if you want to provide a voiceover, and hit the record button.
Why use Recorder over QuickTime?
- Zero Configuration: No need to setup MIDI multi-output devices.
- Instant Sharing: Upload to the cloud immediately after recording.
- Studio Editing: Trim and edit your clips right within the app.
Tips for Better Audio in Your Screen Recordings
Regardless of the tool you use, follow these tips to ensure your audio sounds professional:
1. Use an External Microphone
While the built-in MacBook microphones are decent, a dedicated USB microphone (like a Yeti or a Shure MV7) will significantly reduce background hiss and provide a richer tone.
2. Record in a Quiet Environment
MacOS has built-in "Voice Isolation" features in newer versions, but nothing beats a quiet room. Minimize echo by recording in a space with soft furnishings (carpets, curtains).
3. Check Your Levels
Before starting a long recording, do a 10-second test. Ensure your microphone isn't "clipping" (hitting the red zone in volume meters) and that the system audio isn't overpowering your voice.
4. Enable "System Audio" in Recorder
If you are using Recorder, double-check that the "System Audio" icon is highlighted. This ensures that the viewer hears exactly what you hear during the session.
Conclusion
Recording your screen with audio on a Mac doesn't have to be a technical nightmare. While the built-in Apple tools are great for quick, silent clips, they lack the advanced audio routing capabilities required for modern workflows.
For a seamless experience that captures both your voice and your computer's internal sounds, Recorder is the gold standard.
Ready to start? Download Recorder for Mac here and enable System Audio to take your content to the next level.